Schedule
Schedule is an essential feature in Eventify that allows attendees to keep track of the event's agenda and plan their participation accordingly. By incorporating a comprehensive schedule, you can provide attendees with a clear and organized view of the event, including the start and end times of each session, the speakers, and the topics they will cover.
You can rename Schedule feature to any name of your choice and it will display the given name in the app and web for the event.
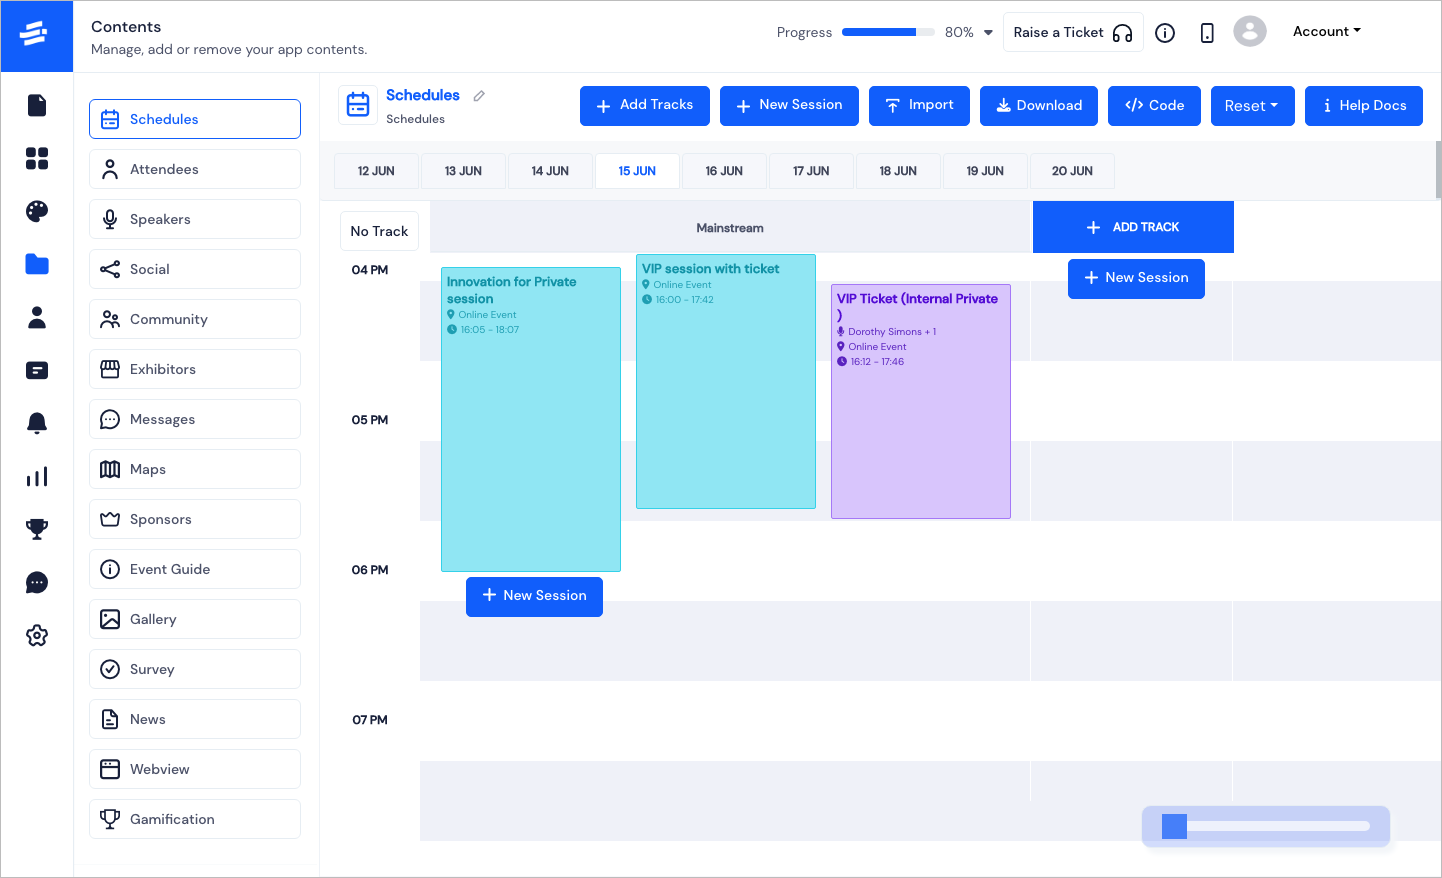
Here you will be able to see a calendar like interface with the event's dates.
Each date can either have Tracks or be Track less. Click on Add Track or No Track depending on your requirement.
Dates with Track - Add Track#
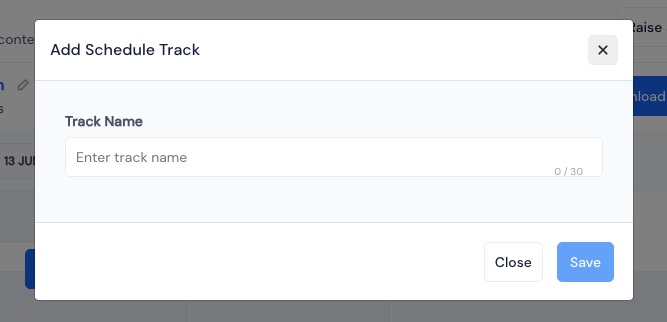
To Add a new Track, click on the Add Track button. The Add Schedule Track pop-up window will appear.
- Enter a Track name and click Save. This will create a new Track.
Add Session - Basic Details#
To Add a new Session, click on the New Session button. The Add Track Session pop-up window will appear.
Enter the following details here to add a session:
- Select the Session Date.
Note: By default the Session Date will be set to the date you were on the calendar, but it can be easily updated from the dropdown option.
- Select a track that the session will be added to, from Choose Track.
Note: This option will appear only if the selected Session Date has the tracks option set.
Give the Session Title.
Enter the Session Location or you can skip it, as the location field is not mandatory.
tip
For Session Location you can give the venue/location name or it can be virtual/online. In order to be more specific, you can also give the hall no./booth no./room no.
Select the Start Time and End Time of the session.
Select the Checkin Type that determines how the session can be attended and how the attendees are tracked. It can be set to No check-in, self check-in and Scan QR check-in.
Select a color for the session from a predefined palette of Session color*.
Select tags for the session from the list of Event Tags or you can skip it, as the tags are not mandatory..
Select one or multiple speakers for the session from the Choose Speaker option.
Note: Click on Link More Speaker to add multiple speakers to a session.
- Provide a description for the session in the Description area.
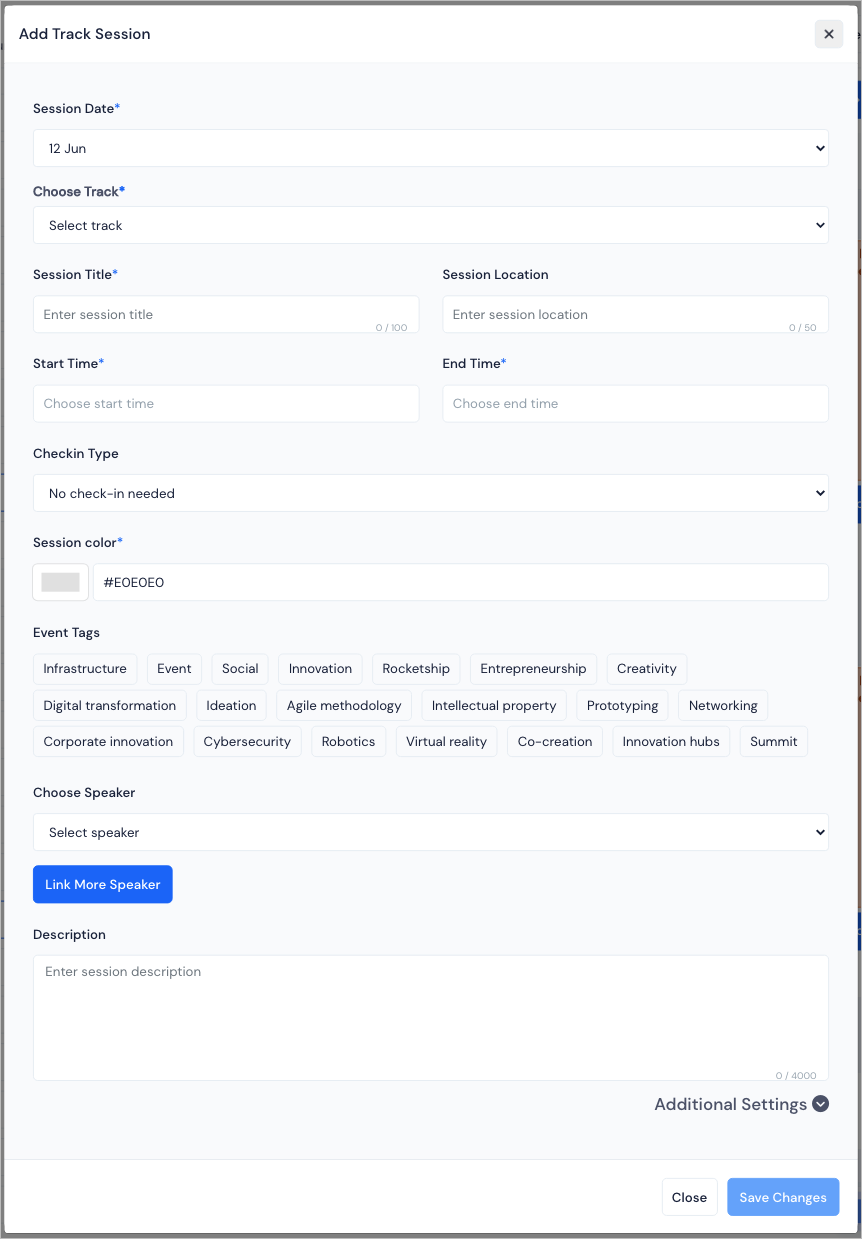
Additional Settings#
To further customise the event, you can fill out the Additiional Settings
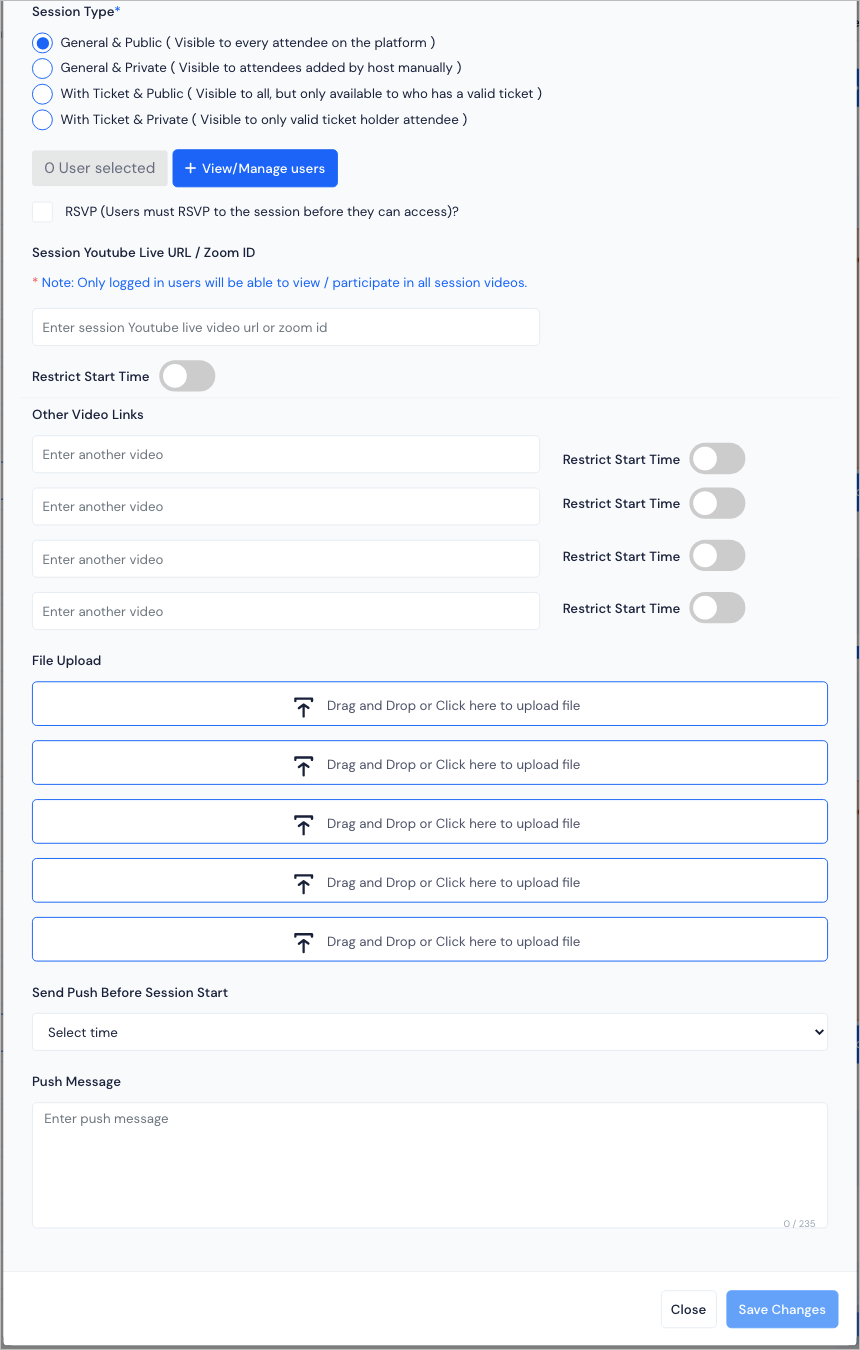
Sessions can be of several types :
General & Public - This type of session is visible to every attendee on the platform and anyone can attend it.
General & Private - This type of session is more exclusive type and is visible to only attendees who are added by the host manually.
With Ticket & Public - This type of session is visible to every attendee on the platform but can be attended by the ones having a valid ticket.
With Ticket & Private - This type of session is exclusively visible and available to attend for the attendees having a valid ticket.
Note: The above two types of sessions with ticket, requires Ticket Association via which the attendees can avail the sessions.
- RSVP - Sessions can be set up with RSVP settings. When checked,the session's attendee needs to confirm their availability from the App or Web before visiting the session.
Along with RSVP check, comes the Capacity settings. It can be set to unlimited or a limited preset seat number.
Note: If capacity is set to a limit and that many attendees have RSVPed, the following attendees attempting to RSVP will get an error stating the session slot is full. You can check the RSVPed list in the Analytics section or manage it from the Edit Track Session > Capacity - View/Manage Users.
- Session Youtube Live URL / Zoom ID You can add a meeting link for the session too in case you want to make it accessible virtually.
Note: Only logged in users will be able to view / participate in all session videos.
Restrict Start Time - If enabled, the video will be accessible after the session's Start Time. A timer will be shown for the video in the app & web end, before the Start Time. If disabled, then the video will be always accessible for the attendees.
Also if there is a requirement for more videos for this session then you can add links under Other video links and every link comes with it's own Restrict Start Time setting.
Add any session related files under the File upload section. You can upload upto 5 files.
A reminder push notification can be set for the session with a custom message from Push Message and preset time for reminding the attendees before the session start time from Send Push Before Session Start.
- Click on Save Changes to save the Session.
The session will be now displayed on the calendar under the specified date and time with a zoom option. You can add any number of sessions in a date/track. Proceed similarly to add more Sessions.
Every session can be edited or deleted. Additionally, you can also do the following:
- Download your session QR from Download Session QR.
- Copy Live Poll URL
- Copy Live QA URL
Other Settings#
Import - There is an option to bulk import the schedule's sessions by using the template file to create your data and upload all sessions in just a few clicks.
Download - You can download the timeschedule pdf file to get an information on all the sessions, throughout the event dates.
Embed Code - You can use the embed code to display the schedule calendar in any website you require.
Reset - You will have options to delete all sessions or all tracks with sessions in order to bulk clean the calendar
FAQs#
Q: Can we run multi sessions at a point in time?
Yes, we can create multiple tracks to run multiple sessions at any point in time. Tracks are like the rooms or the places where the session is hosted.
Q: Can you suggest some meeting room names that we can add as a "Track"?
Generally, the names depend on the type of event but commonly the names are kept on the basis of the sitting arrangement.
Here is a list of names we can suggest:
a) Cocktail
b) Clusters
c) Circle
d) Semi-Circle
e) Cafe Style
f ) Hollow Square
g) Conference
h) X-Formation
i ) U-Shape
j ) Theater
k) Banquet
l ) Classroom
Likewise many more.
Q: Can we create a private session?
Yes, an admin can create private sessions from the admin panel and can associate users to access those sessions.
Q: Is it possible to keep general sessions, ticket-based sessions & private sessions at a time in the platform?
Yes, it is possible for an organizer to create different types of sessions.
General sessions: Public sessions available to everyone to view and participate
Additional Session: Public sessions are available to those who have registered through tickets.
Private session: Session available for viewing and participation, only to an invited group of people. The organizer can add users through the admin panel.
Q: How to restrict session play before the time?
Yes, organizers can restrict the start time for all types of sessions. It is useful during virtual sessions as it restricts attendees to join the session before the scheduled time. You can enable the timer & when the schedule starts it will be available.
Q: Can sessions be associated with tickets?
Yes, sessions can be ticket-based, sessions can be available to attendees who have purchased tickets.
Q: Can we add multiple speakers to a session?
Yes, we can associate two or more speakers to a session.
Q: Can files be attached with sessions for attendees to download?
Yes, inside each session we can upload multiple documents in jpeg, png, or pdf format for attendees to view or download them from their phones.